Overview
Terraform is a tool for building, changing and versioning infrastructure safely and efficiently. Terraform can manage existing and popular cloud service providers as well as custom in-house solutions.
Configuration files describe to Terraform the components needed to run a single application or your entire datacenter. Terraform generates an execution plan describing what it will do to reach the desired state, and then executes it to build the described infrastructure. As the configuration changes, Terraform is able to determine what changed and create incremental execution plans which can be applied.
What’s covered in this lab
In this lab, you will see
- How open source tools, such as Terraform can be leveraged to implement Infrastructure as Code (IaC)
- How to automate your infrastructure deployments in the Cloud with Terraform and Azure Pipelines
The following image will walk you through all the steps explained in this lab

Before you begin
-
Refer to the Getting Started page before you begin following the exercises.
-
Use the Azure DevOps Demo Generator to provision the project on your Azure DevOps organization. This URL will automatically select Terraform template in the demo generator. If you want to try other projects, use this URL instead -azuredevops generator
Follow the simple walkthrough to know how to use the Azure DevOps Demo Generator.
Exercise 1: Examine the Terraform file (IaC) in your Source code
In this lab, you will use PartsUnlimited which is an example eCommerce website developed using .Net Core. You will examine the terraform file which helps you to provision the Azure Resources required to deploy PartsUnlimited website.
-
Navigate to the project you created above using Azure DevOps Demo Generator
-
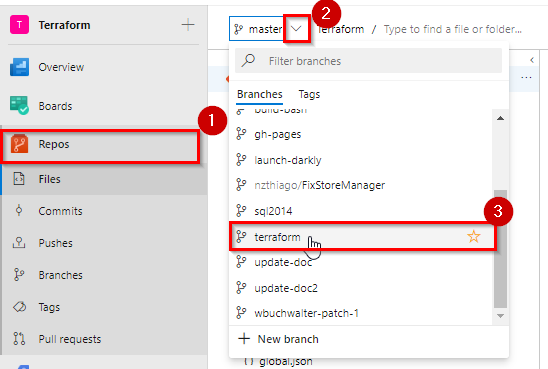
Select Repos. Switch to terraform branch.
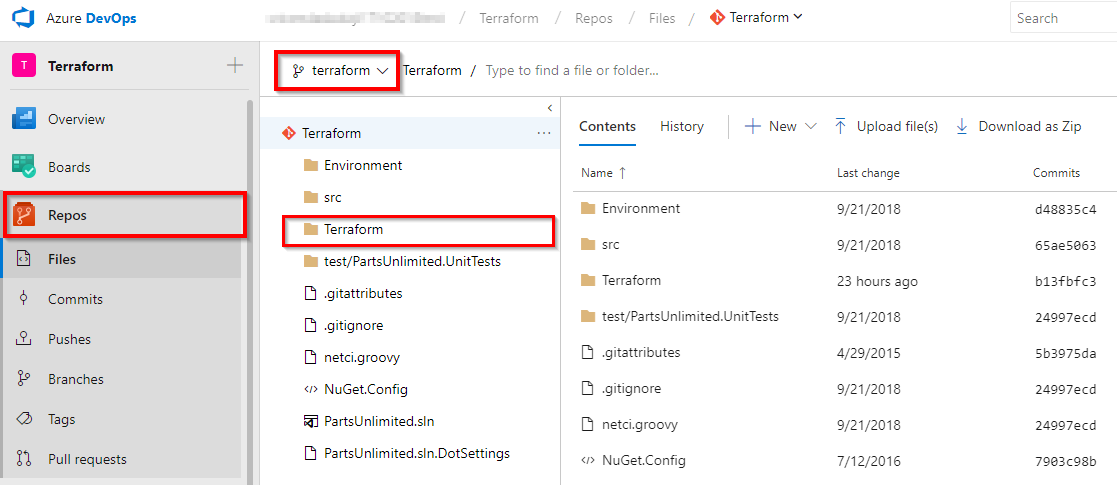
Make sure that you are now on the terraform branch and Terraform folder is there in the repo.
-
Select the webapp.tf file under the Terraform folder. Go through the code.
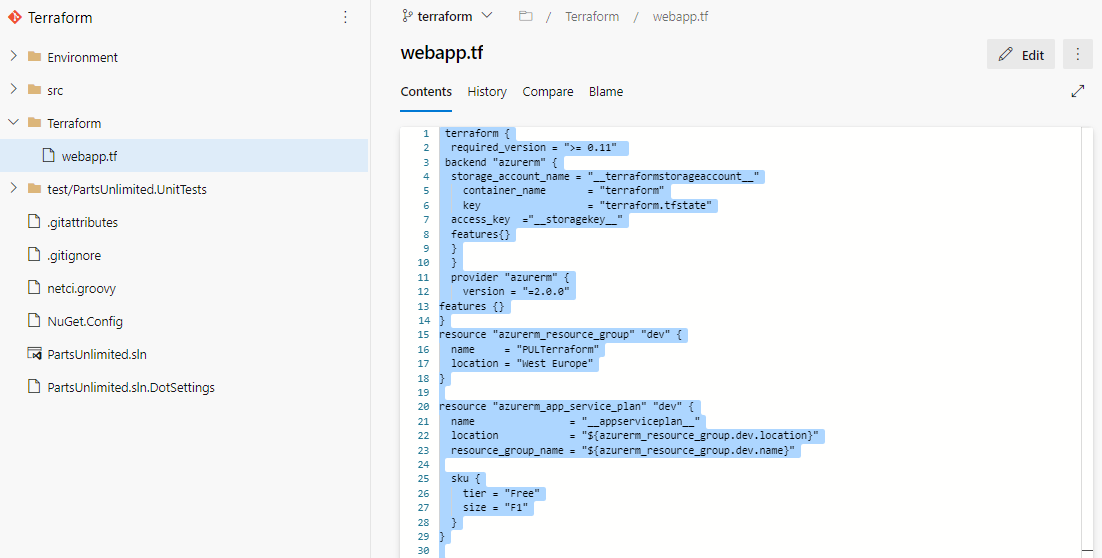
webapp.tf is a terraform configuration file. Terraform uses its own file format, called HCL (Hashicorp Configuration Language). This is very similar to YAML.
In this example, we want to deploy an Azure Resource group, App service plan and App service required to deploy the website. And we have added Terraform file (Infrastructure as Code) to source control repository in your Azure DevOps project which can deploy the required Azure resources.
If you would like to learn more about the terraform basics click here.
Exercise 2: Build your application using Azure CI Pipeline
In this exercise, you will build your application and publish the required files to an artifact called drop.
-
Navigate to Pipelines –> Pipelines. Select Terraform-CI and click Edit.
 Note: We also have a YAML build pipeline if that’s something you’re interested in. To proceed through the YAML pipeline, choose Terraform-CI-YAML and click Edit to view the YAML pipeline. If you utilize the YAML pipeline, make sure to update the Terraform-CD release definition’s artifact link.
 -
Your build pipeline will look like as below. This CI pipeline has tasks to compile .Net Core project. The
dotnettasks in the pipeline will restore dependencies, build, test and publish the build output into a zip file (package) which can be deployed to a web application.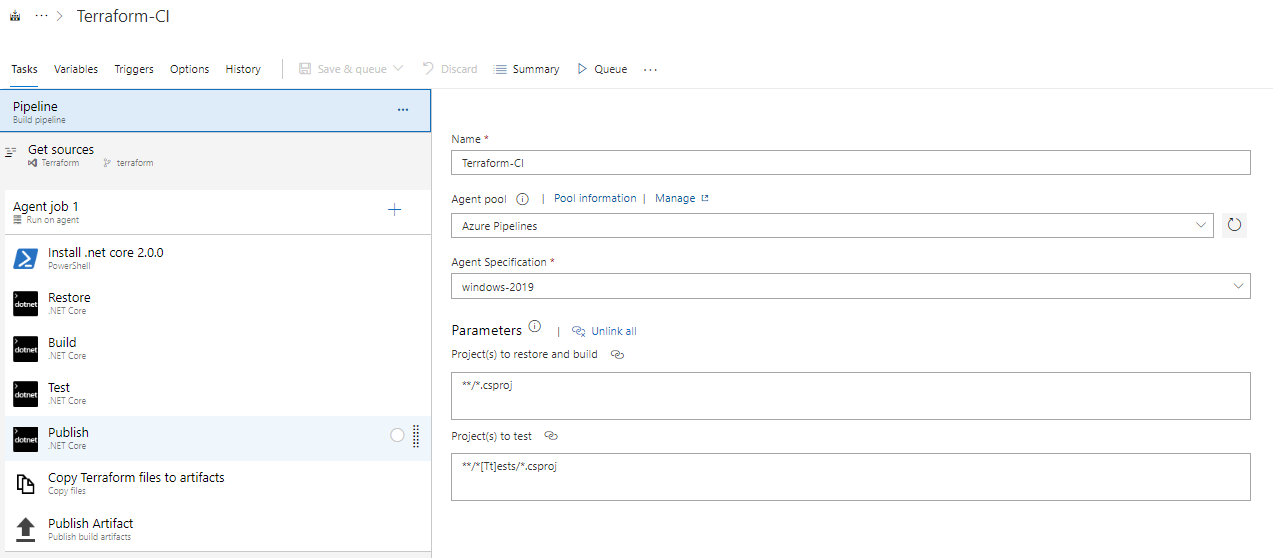
For more guidance on how to build .Net Core projects with Azure Pipelines see here.
-
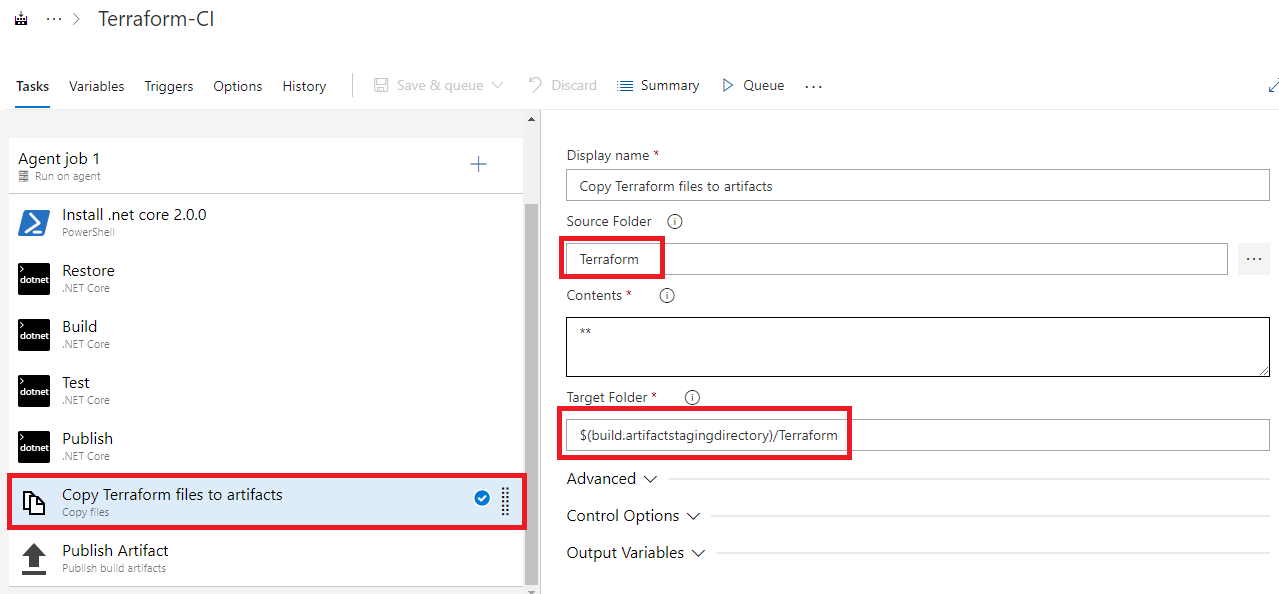
In addition to the application build, we need to publish terraform files to build artifacts so that it will be available in CD pipeline. So we have added Copy files task to copy Terraform file to Artifacts directory.
-
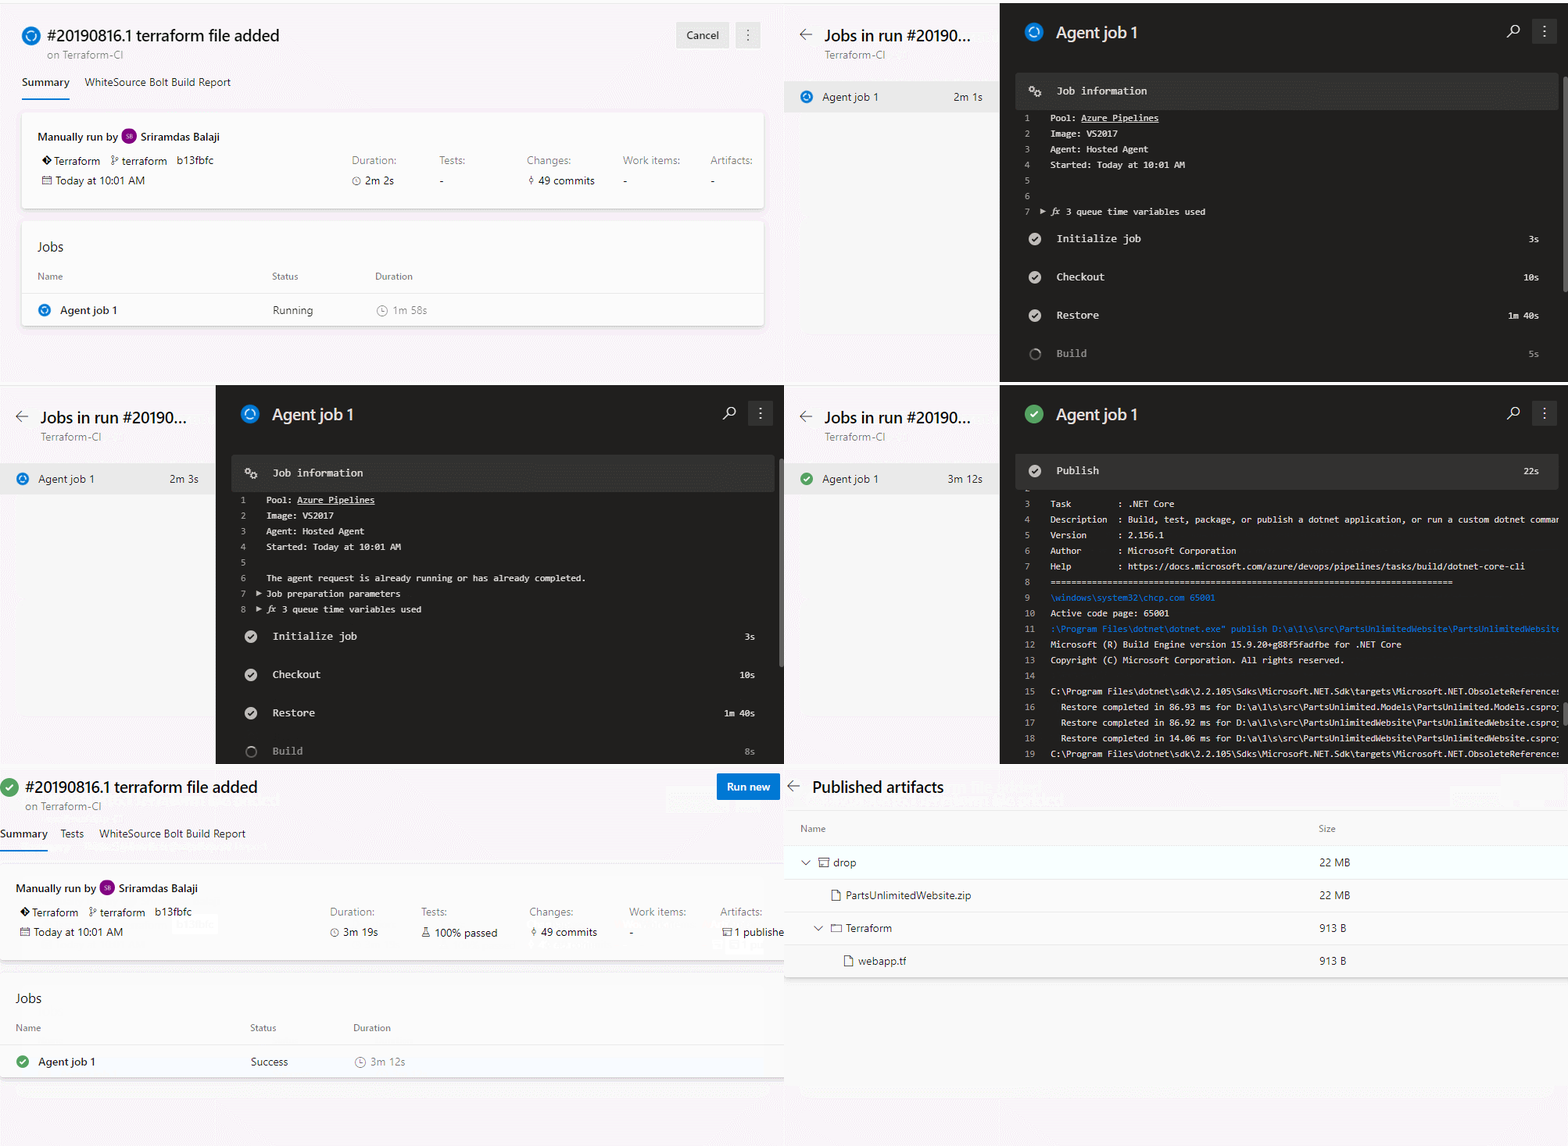
Now click Queue to trigger the build. Once the build succeeds, verify that the artifacts have Terraform folder and PartsUnlimitedwebsite.zip file in the drop.
Exercise 3: Deploy resources using Terraform (IaC) in Azure CD pipeline
In this exercise, you will create azure resources using Terraform as part of your deployment(CD) pipeline and deploy the PartsUnlimited application to the App service provisioned by Terraform.
-
Navigate to Pipelines –> Releases. Select Terraform-CD and click Edit.

-
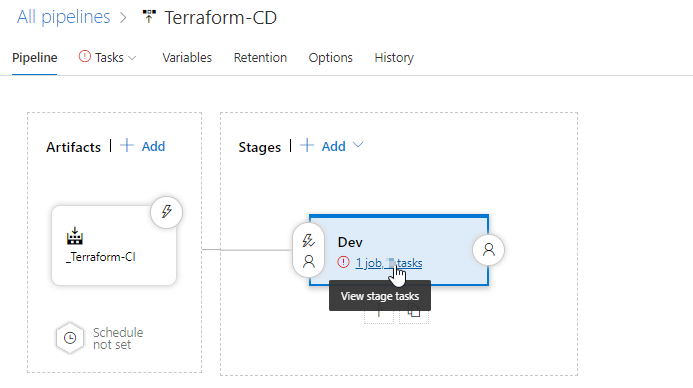
Select Dev stage and click View stage tasks to view the pipeline tasks.
-
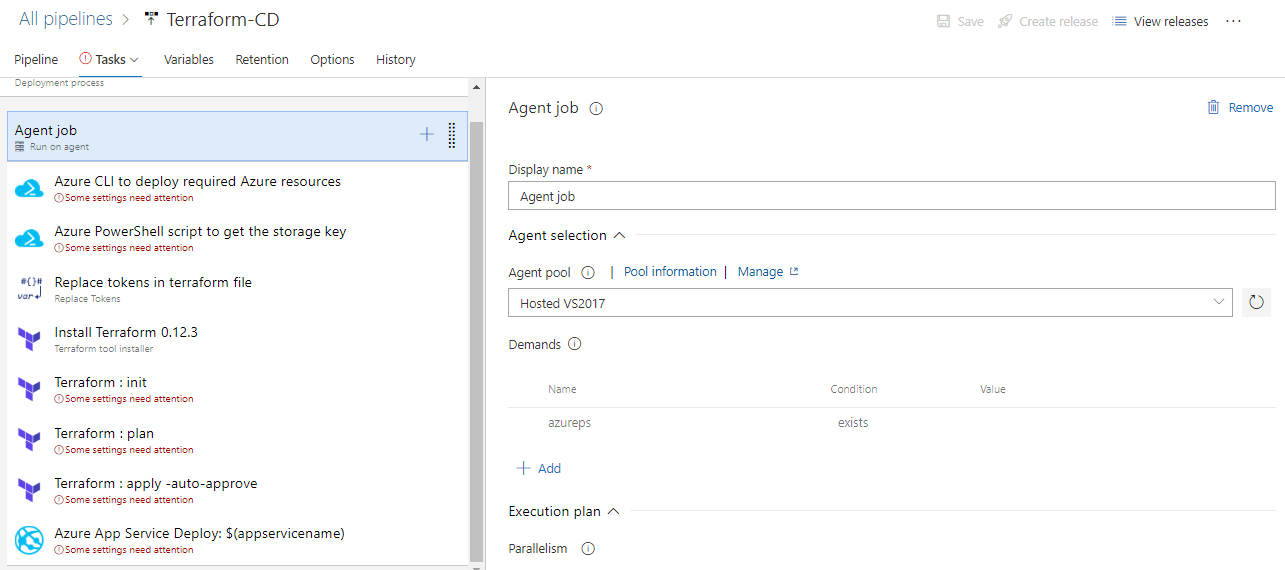
You will see the tasks as below.
-
Select the Azure CLI task. Select the Azure subscription from the drop-down list and click Authorize to configure Azure service connection.
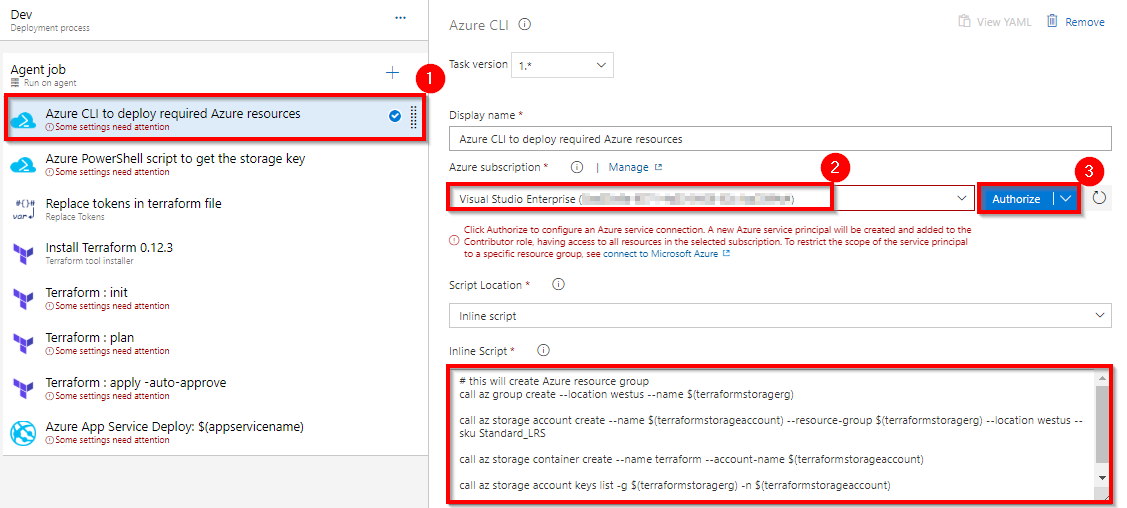
By default, Terraform stores state locally in a file named terraform.tfstate. When working with Terraform in a team, use of a local file makes Terraform usage complicated. With remote state, Terraform writes the state data to a remote data store. Here we are using Azure CLI task to create Azure storage account and storage container to store Terraform state. For more information on Terraform remote state click here
-
Select the Azure PowerShell task. Select Azure service connection from the drop-down.
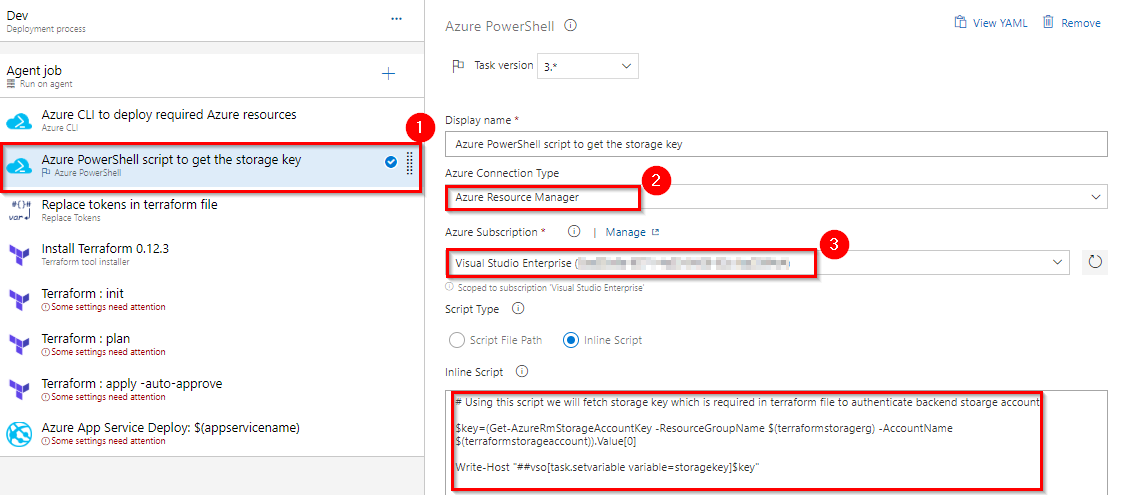
To configure the Terraform backend we need Storage account access key. Here we are using Azure PowerShell task to get the Access key of the storage account provisioned in the previous step.
-
Select the Replace tokens task.
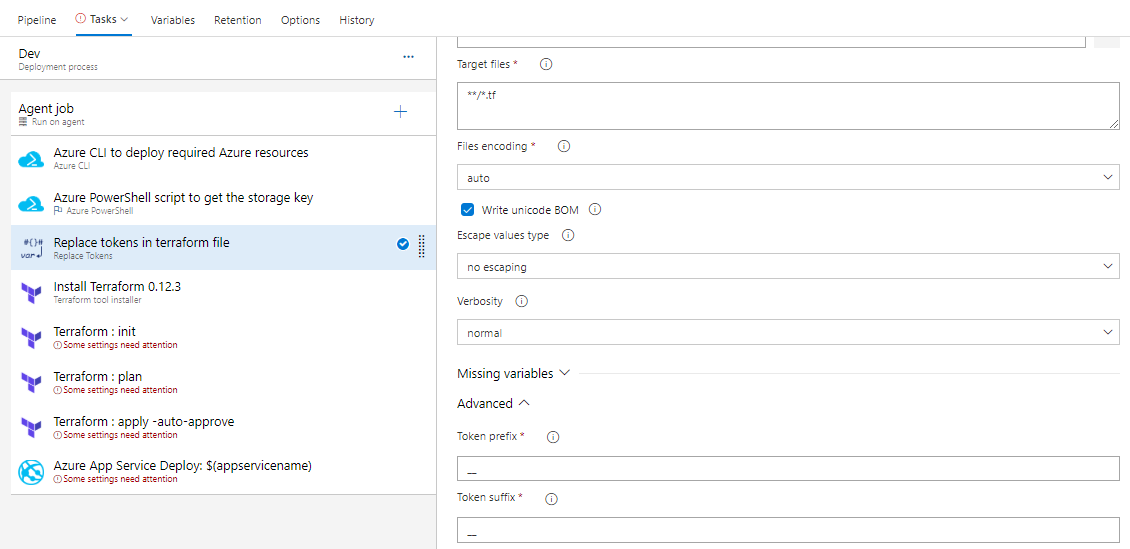
If you observe the webapp.tf file in Exercise 1, Step 3 you will see there are few values are suffixed and prefixed with __. For example __terraformstorageaccount__. Using Replace tokens task we will replace those values with the variable values defined in the release pipeline.

-
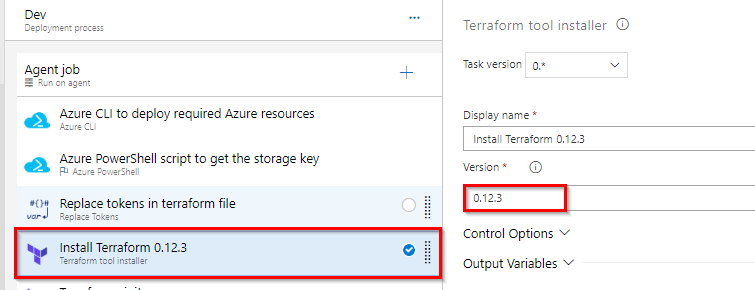
Terraform tool installer task is used to install a specified version of Terraform from the Internet or the tools cache and prepends it to the PATH of the Azure Pipelines Agent (hosted or private).
-
When running Terraform in automation, the focus is usually on the core plan/apply cycle.
The main Terraform workflow is shown below:

i. Initialize the Terraform working directory.
ii. Produce a plan for changing resources to match the current configuration.
iii. Apply the changes described by the plan.
The next Terraform tasks in your release pipeline help you to implement this workflow.
-
Select the Terraform init task. Select Azure service connection from the drop-down. And make sure to enter the container name as terraform. For the other task parameters information see here

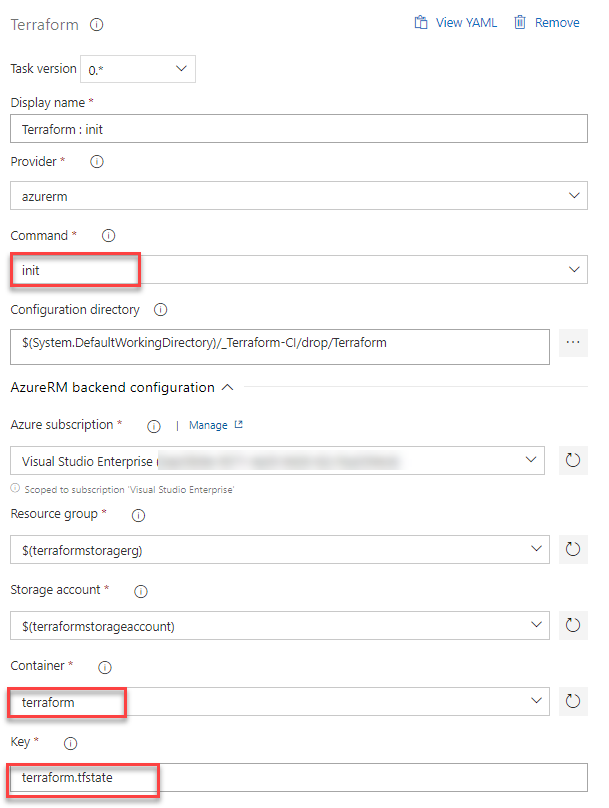
This task runs
terraform initcommand. Theterraform initcommand looks through all of the *.tf files in the current working directory and automatically downloads any of the providers required for them. In this example, it will download Azure provider as we are going to deploy Azure resources. For more information aboutterraform initcommand click here -
Select the Terraform plan task. Select Azure service connection from the drop-down.
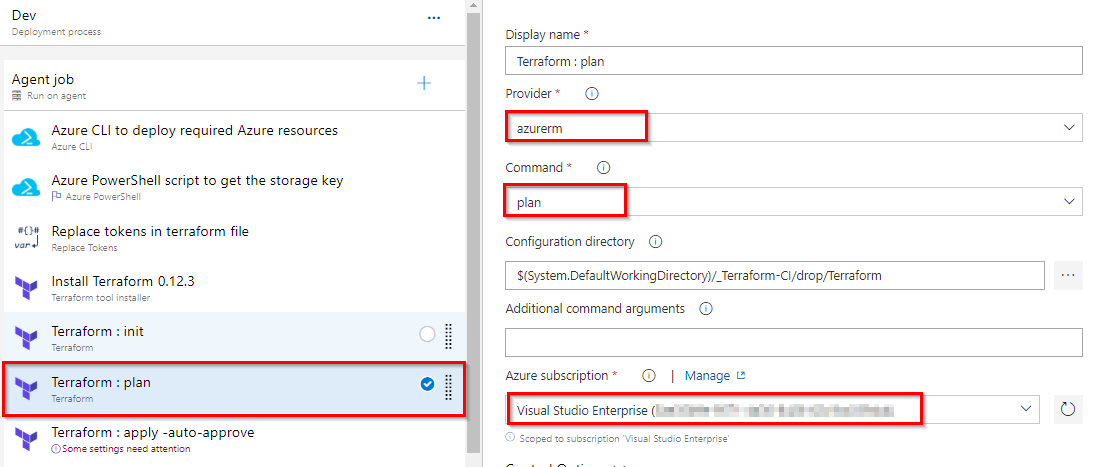
The
terraform plancommand is used to create an execution plan. Terraform determines what actions are necessary to achieve the desired state specified in the configuration files. This is a dry run and shows which actions will be made. For more information aboutterraform plancommand click here -
Select the Terraform Apply task. Select Azure service connection from the drop-down.
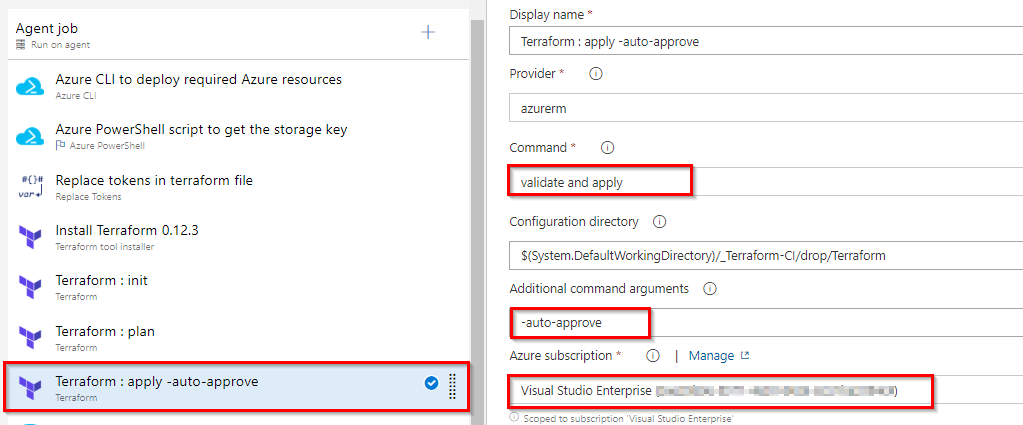
This task will run the
terraform applycommand to deploy the resources. By default, it will also prompt for confirmation that you want to apply those changes. Since we are automating the deployment we are addingauto-approveargument to not prompt for confirmation. -
Select Azure App Service Deploy task. Select Azure service connection from the drop-down.
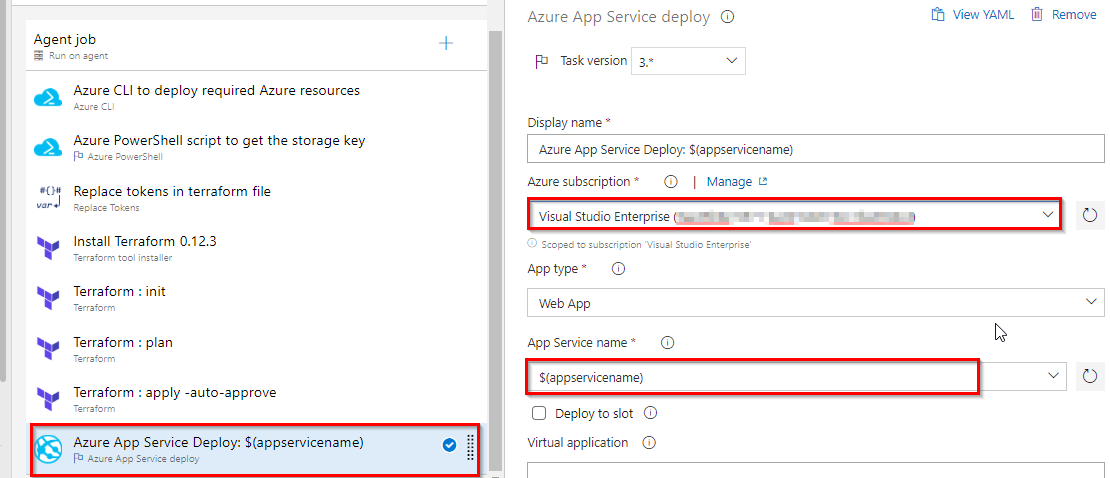
This task will deploy the PartsUnlimited package to Azure app service which is provisioned by Terraform tasks in previous steps.
-
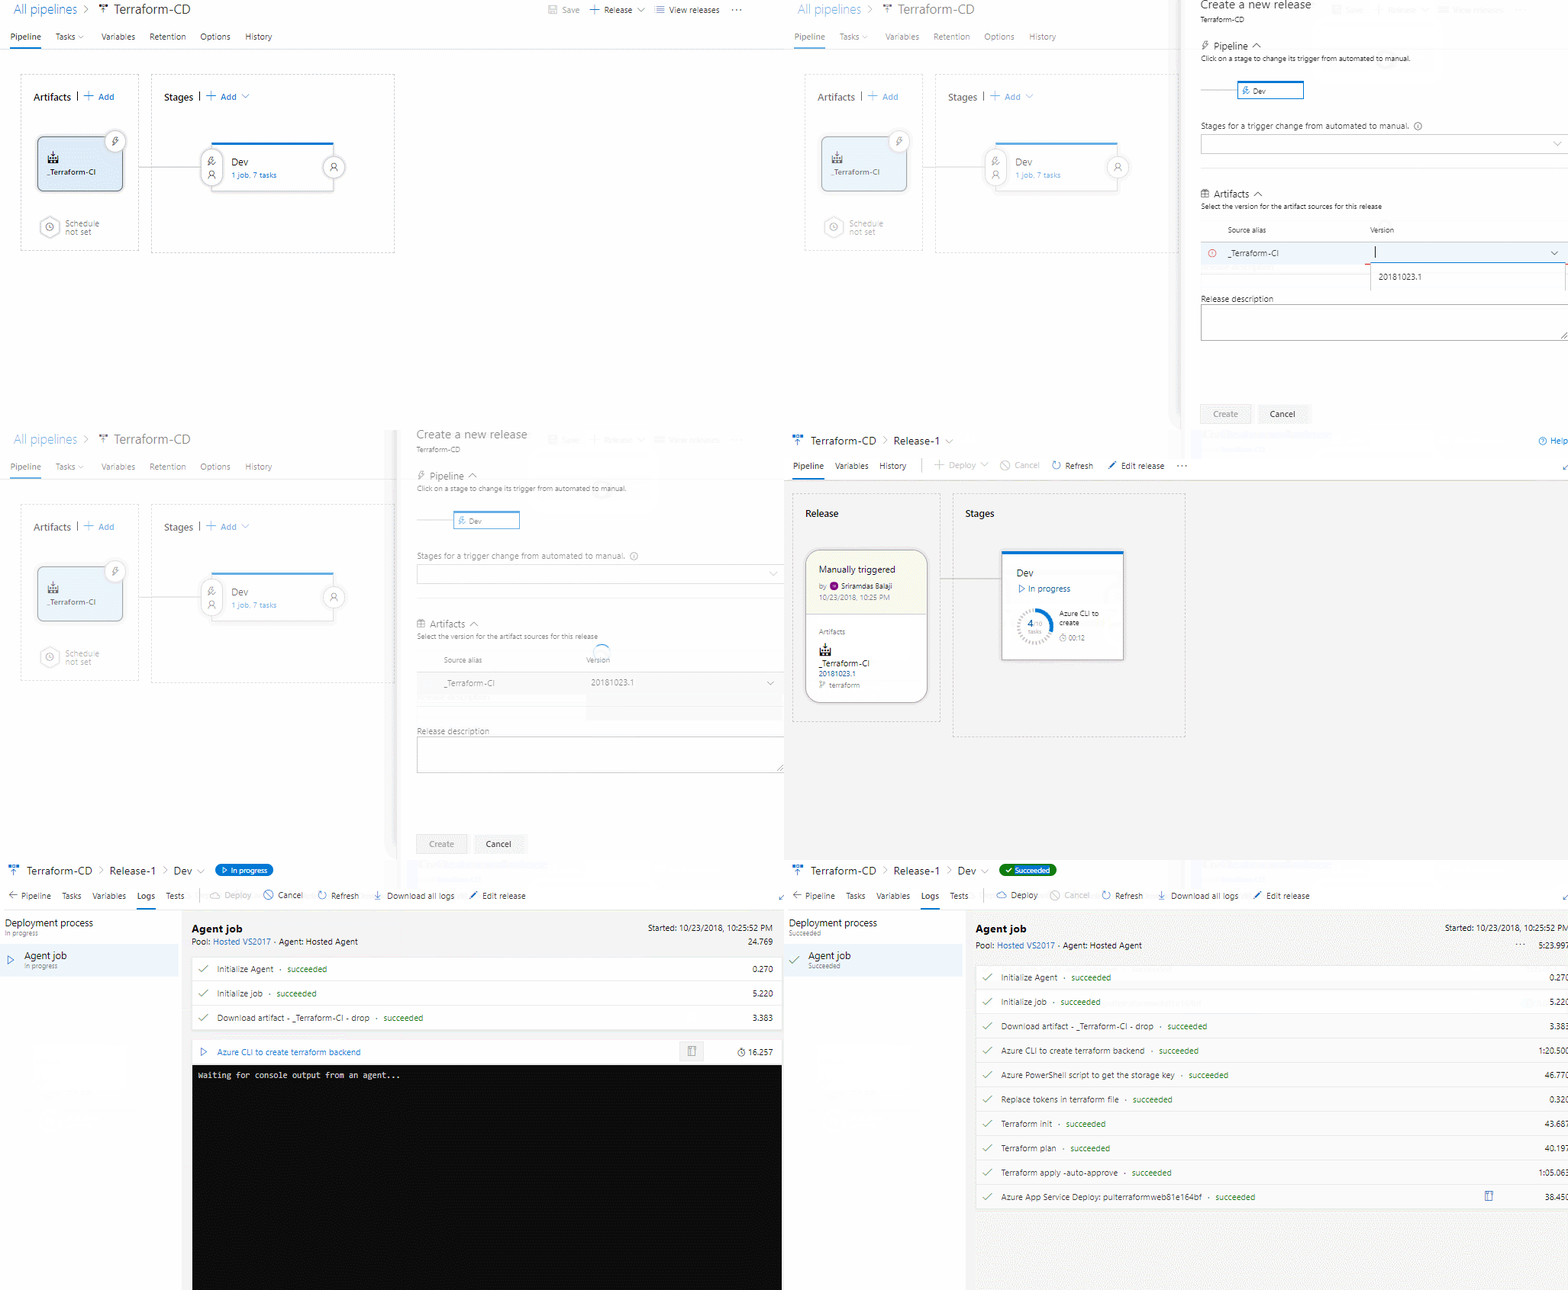
Once you are done Save the changes and Create a release.
-
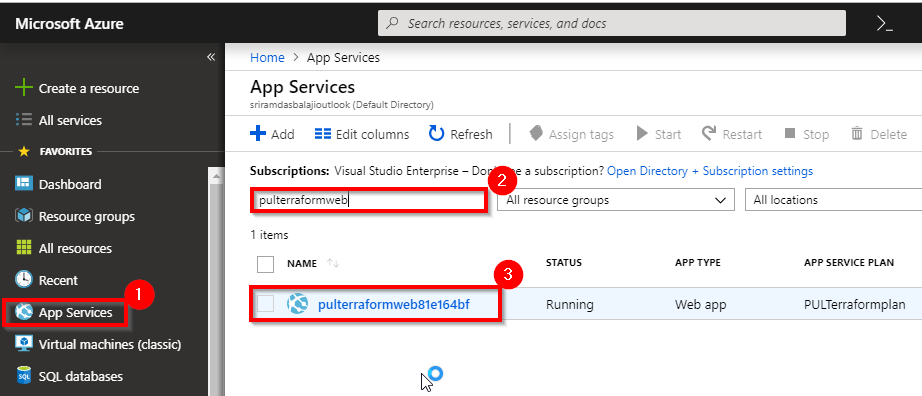
Once the release is success navigate to your Azure portal. Search for pulterraformweb in App services. Select pulterraformweb-xxxx and browse to view the application deployed.

Do you want to learn more about Terraform? If yes click here for Terraform documentation.
Summary
In this lab, you have learned how to automate repeatable deployments with Terraform on Azure using Azure Pipelines.
Reference
You can watch the following video that walks you through all the steps explained in this lab